FXML tutorial (8) – tworzenie obiektów (1)
Użycie elementów
Obiekty w FXML tworzymy m. in. przez użycie elementów scenografu, tak jak pokazywałem to wielokrotnie:
<HBox>
...
</HBox>
Użycie fx:value
Klasy immutable np. String zazwyczaj zawierają statyczną metodę String.valueOf(). W języku FXML możemy zapisać to jako <String fx:value="Tak"/>.
listing08_fxvalue.fxml
<?xml version="1.0" encoding="UTF-8"?>
<?language groovy?>
<?import javafx.scene.layout.VBox?>
<?import javafx.scene.layout.HBox?>
<?import javafx.scene.control.Label?>
<?import javafx.scene.control.Button?>
<?import java.lang.String?>

<VBox xmlns:fx="http://javafx.com/fxml">
	<Label fx:id="lab1" text="Twoja decyzja?" />
	<HBox fx:id="hbox">
		<Button fx:id="but1" onAction="showText1();">
			<text>
				<String fx:value="Tak" />
			</text>
		</Button>
		<Button fx:id="but2" text="Nie" onAction="showText2()" />
		<Button fx:id="but3" text="Anuluj" onAction="showText3()" />
	</HBox>
	<fx:script>
		def showText1() {
		lab1.setText("Wybrałeś 'Tak'")
		}
		def showText2() {
		lab1.setText("Wybrałeś 'Nie'")
		}
		def showText3() {
		lab1.setText("Wybrałeś 'Anuluj'")
		}
	</fx:script>
</VBox>
listing08_fxvalue.java
package codes;

import javafx.application.Application;
import javafx.fxml.FXMLLoader;
import javafx.scene.Scene;
import javafx.scene.layout.VBox;
import javafx.stage.Stage;

import java.net.URL;
public class Listing08_fxvalue extends Application {
    public static void main(String[] args) {
        Application.launch(args);
    }

    @Override
    public void start(Stage stage) {
        try {
            URL fxmlUrl = this.getClass().getClassLoader()
                    .getResource("resources/listing08_fxvalue.fxml");
            VBox root = fxmlUrl != null ? FXMLLoader.load(fxmlUrl) : new VBox();
            Scene scene = new Scene(root, 150, 80);
            stage.setScene(scene);
            stage.show();
        } catch (Exception e) {
            e.printStackTrace();
        }
    }
}
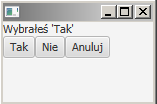
Po uruchomieniu klasy i kliknięciu przycisku zobaczymy odpowiedni napis:


